Isometric Starling – Part II
Continuing on from my last post I will talk a bit about the conversion of Tonypa’s AS1 isometric tutorial to AS3 Starling. This was the next step in my isometric journey. I learnt a lot along the way, see below for some explanation and tricks. Also at the end I will discuss what improvements need to be made and what I did next. First up, the result.
Tonypa’s AS1 SWF
TARGET – Flashplayer 5, Display List and ActionScript 1
CONTROLS – W,A,S,D and arrow keys
AS3 Starling version
TARGET – Flashplayer 11, Starling and ActionScript 3
CONTROLS – W,A,S,D and arrow keys
TILES – http://opengameart.org/content/isometric-64×64-outside-tileset
Conversion
One of the big hurdles during the conversion was not wanting to create an object for every tile. It would have been fine to do so for such a small map but I knew this would create issues for me later. The AS1 version uses an object for every tile which is referenced when necessary.
In the AS3 Starling version I decided to use “tile containers”. This is very similar to the AS1 version, I just don’t keep any objects and recycle the containers. When the character moves it determines if a new row or column of tiles needs to be swapped out. If so it shuffles the tile containers and repopulates them from the map array. The idea behind this was to not have every tile object in memory, rather just what is necessary. I go through a few of the important concepts I learnt along the way.
Tile images with height
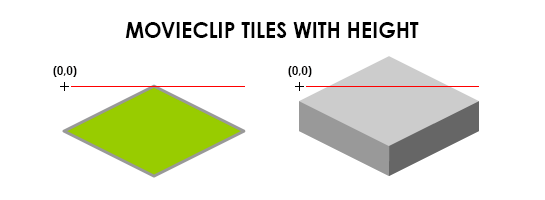
In Tonypa’s tutorial tiles with height are setup in Movieclips. This is done by keeping a (0,0) registration in the top left of a tile with no height. See below how a traditional display object Movieclip tile is setup with height:
In Starling you can have tiles with height by modifying the pivotY property of an Image or Sprite. Just take the height difference of the image from a tile image with no height like shown below:
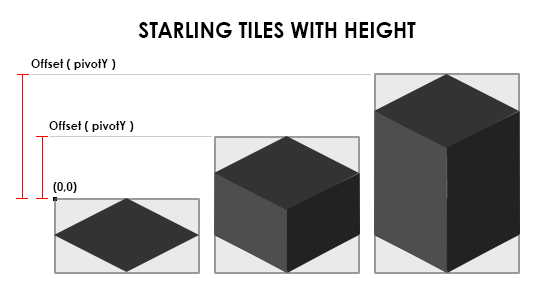
image = new Image(texture);
image.pivotY = yOffset;
Layers, layers, layers
I feel it is important to point out the value of layers in Tonypa’s tutorial. Trying to manage all tile images on one layer is a nightmare and will riddle your display with visual errors. In the example the walkable tiles are placed on a background layer and the character and walls on a foreground layer. This cleans up the display list greatly. In this map it is done by using 0′s as the ground and 1′s as the walls. Look below at the map array and then how this would be seperated into two layers for display.
private var myMap:Array = new Array(
 [1, 1, 1, 1, 1, 1, 1, 1, 1, 1, 1, 1, 1, 1],
 [1, 0, 0, 0, 0, 0, 0, 0, 0, 0, 0, 0, 0, 1],
 [1, 0, 0, 0, 0, 0, 0, 0, 0, 1, 0, 0, 0, 1],
 [1, 0, 0, 0, 0, 0, 0, 0, 0, 0, 0, 0, 0, 1],
 [1, 0, 0, 0, 0, 0, 0, 0, 0, 0, 0, 0, 0, 1],
 [1, 0, 0, 0, 0, 0, 0, 0, 0, 0, 1, 0, 0, 1],
 [1, 0, 0, 1, 0, 0, 0, 0, 0, 0, 0, 0, 0, 1],
 [1, 0, 0, 0, 0, 0, 0, 0, 0, 0, 0, 0, 0, 1],
 [1, 1, 1, 1, 1, 1, 1, 1, 1, 1, 1, 1, 1, 1]
);
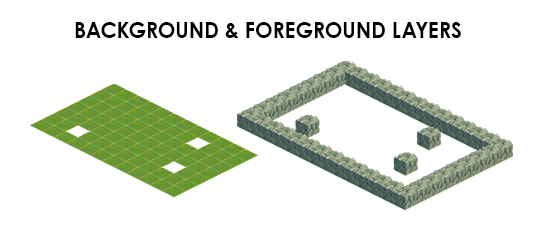
Basically as a rule of thumb, anything that visually interacts with your character should be on the foreground layer. Eg. walls, items, enemies etc.
Depth sorting
One of the challenges with an isometric display list is the images constantly overlap each other. I researched a whole bunch of different solutions but in the end I found a nice simple way for Starling to take care of this for me. Starling has a sortChildren property for any display object container, which allows you to compare two display objects using a function. See below for this great solution I found on the Starling forums:
public function sortOnY(do1:DisplayObject, do2:DisplayObject):int
{
	if (do1.y > do2.y) return 1;
	if (do1.y < do2.y) return -1;
	if (do1.x > do2.x) return 1;
	if (do1.x < do2.x) return -1;

	return 0;
}
AnyDisplayObjectContainer.sortChildren(sortOnY);
Viewport culling
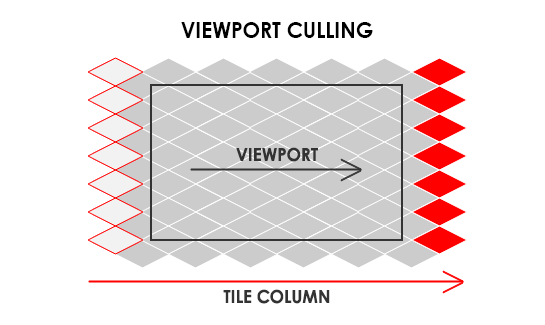
Another important concept to get your head around with isometric engines is viewport culling. In order to have a very large map, every tile can not be on the display list at the same time to avoid excessive memory load.
The way to get around this is by only displaying what is absolutely necessary. The image below illustrates how when the view moves right, the column of tiles from the left is “recycled” and added to the right. During this process the image of the tile can be replaced and any other properties updated as you require.
Improvements
The AS3 Starling version is by no means perfect at this stage but a good start. Here is a list of improvements I wanted to make.
- Change from individual tiles to a TextureAtlas to reduce draw calls
- Character as a MovieClip with basic animation
- Allow for very large tilemaps
- Look into Texture and Image pools
- Change collision detection to reference the base map array
- Build a prototype that proved Starling and Flash was up to the task of a large scrolling isometric map
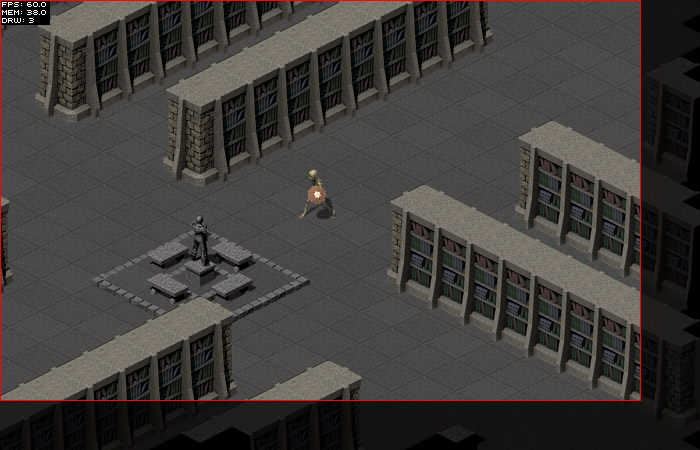
After going through this conversion I had a lot I wanted to test out. The obvious solution was to start from scratch and build my own basic engine. And that’s exactly what I did. Here is a sneak peek at where I got to. Details to come in my next post.




Hello!
Can u post the AS3 starling source code?
Hi there, I haven’t put up the source as it’s a mess. I have been directing people to as3isolib port to starling. Take a look here https://github.com/HiWill/as3isolib_starling. Cheers